捯饬新的博客:我把机组搬到了博客里
这篇文章诞生自我未泯的童心。
四月的时候,在一次旅行中,我有了这种强烈的冲动去写一篇游记,首先发在了机核上。然后按照惯例,我会整理一份 Markdown 格式发在自己的博客上。
结果在我编辑完之后,发现博客坏掉了。
以前的博客
搭个人博客的风潮是在大三那年我们系流行来的。7 年前这篇令我脚趾抓地的文章介绍了最初我搭建这个博客的心路历程。
至于原因,一来是因为我想要敦促自己写点东西;二来是因为想搞点工程实践,结合一些学校不教的、最新流行的花哨技术;而且有个域名真挺酷的,至少我觉得酷。
让我们演绎一下那时的场景:
当我学到一点点新东西之后,怀着激动的心情,赶紧把心中的想法记录成一篇 Markdown 格式的文档。
写完之后,潇洒地执行几条命令把新博客推送上去:
$ git add .
$ git commit -m "new blog! hahahaha"
$ git push origin master
然后兴冲冲地打开 CI 的界面,CI 在那时还算时髦,DevOps 的理念才提出来没几年。在 CI 的 log 页面等待着连同这篇文章在内的整个博客被构建成为一个静态的 html 网站,等待着 Travis 使用我的密钥将构建产物推送到 git 仓库里,等待着 Github 将构建产物发布出来。
最后进入我的域名 https://blog.thrimbda.com 心满意足地看着那篇新文章出现在页面最顶上的位置。
经年累月,这个过程变得无聊,无聊并且持续有效,直到它失效的那天来临。
新的博客
4 月底的那天,我连续重试了 3 次 CI pipeline 全部失败,大略一看 log 发现某个用于构建的依赖项似乎因为太过久远以至于从互联网上消失了。我才意识到 7 年在这个行业是一个多么巨大的时间跨度,久到风沙摧毁城堡,海水吞没山峰。
于是在工作摸鱼的空隙,带着一些不算有趣的诉求做了技术选型:足够简单、足够方便。
这个新的博客就诞生了,按照惯例要介绍一下:
作为旧博客的替代,这个新的博客就完成了。
童心未泯的捯饬过程
也许是因为足够新,或者是因为技术选型足够简单,也许是因为前端工作的反馈闭环足够短,再加上和阿铮一起工作难免会耳濡目染一些前端知识,补上了大一这部分没怎么用心学的知识漏洞,折腾博客的过程再一次变得有趣了起来。
一些小试牛刀的 css 样式修改,加上了新的 gitcus,把评论区托管到 github 上;我和七年前的自己达成一致:编码和折腾工程果然是一件快乐的事情,是劳动的快乐,是游戏的快乐。
我想借着这份快乐的余波着重讲(自嗨)一下自己将机组搬到博客里的技术过程。
数据
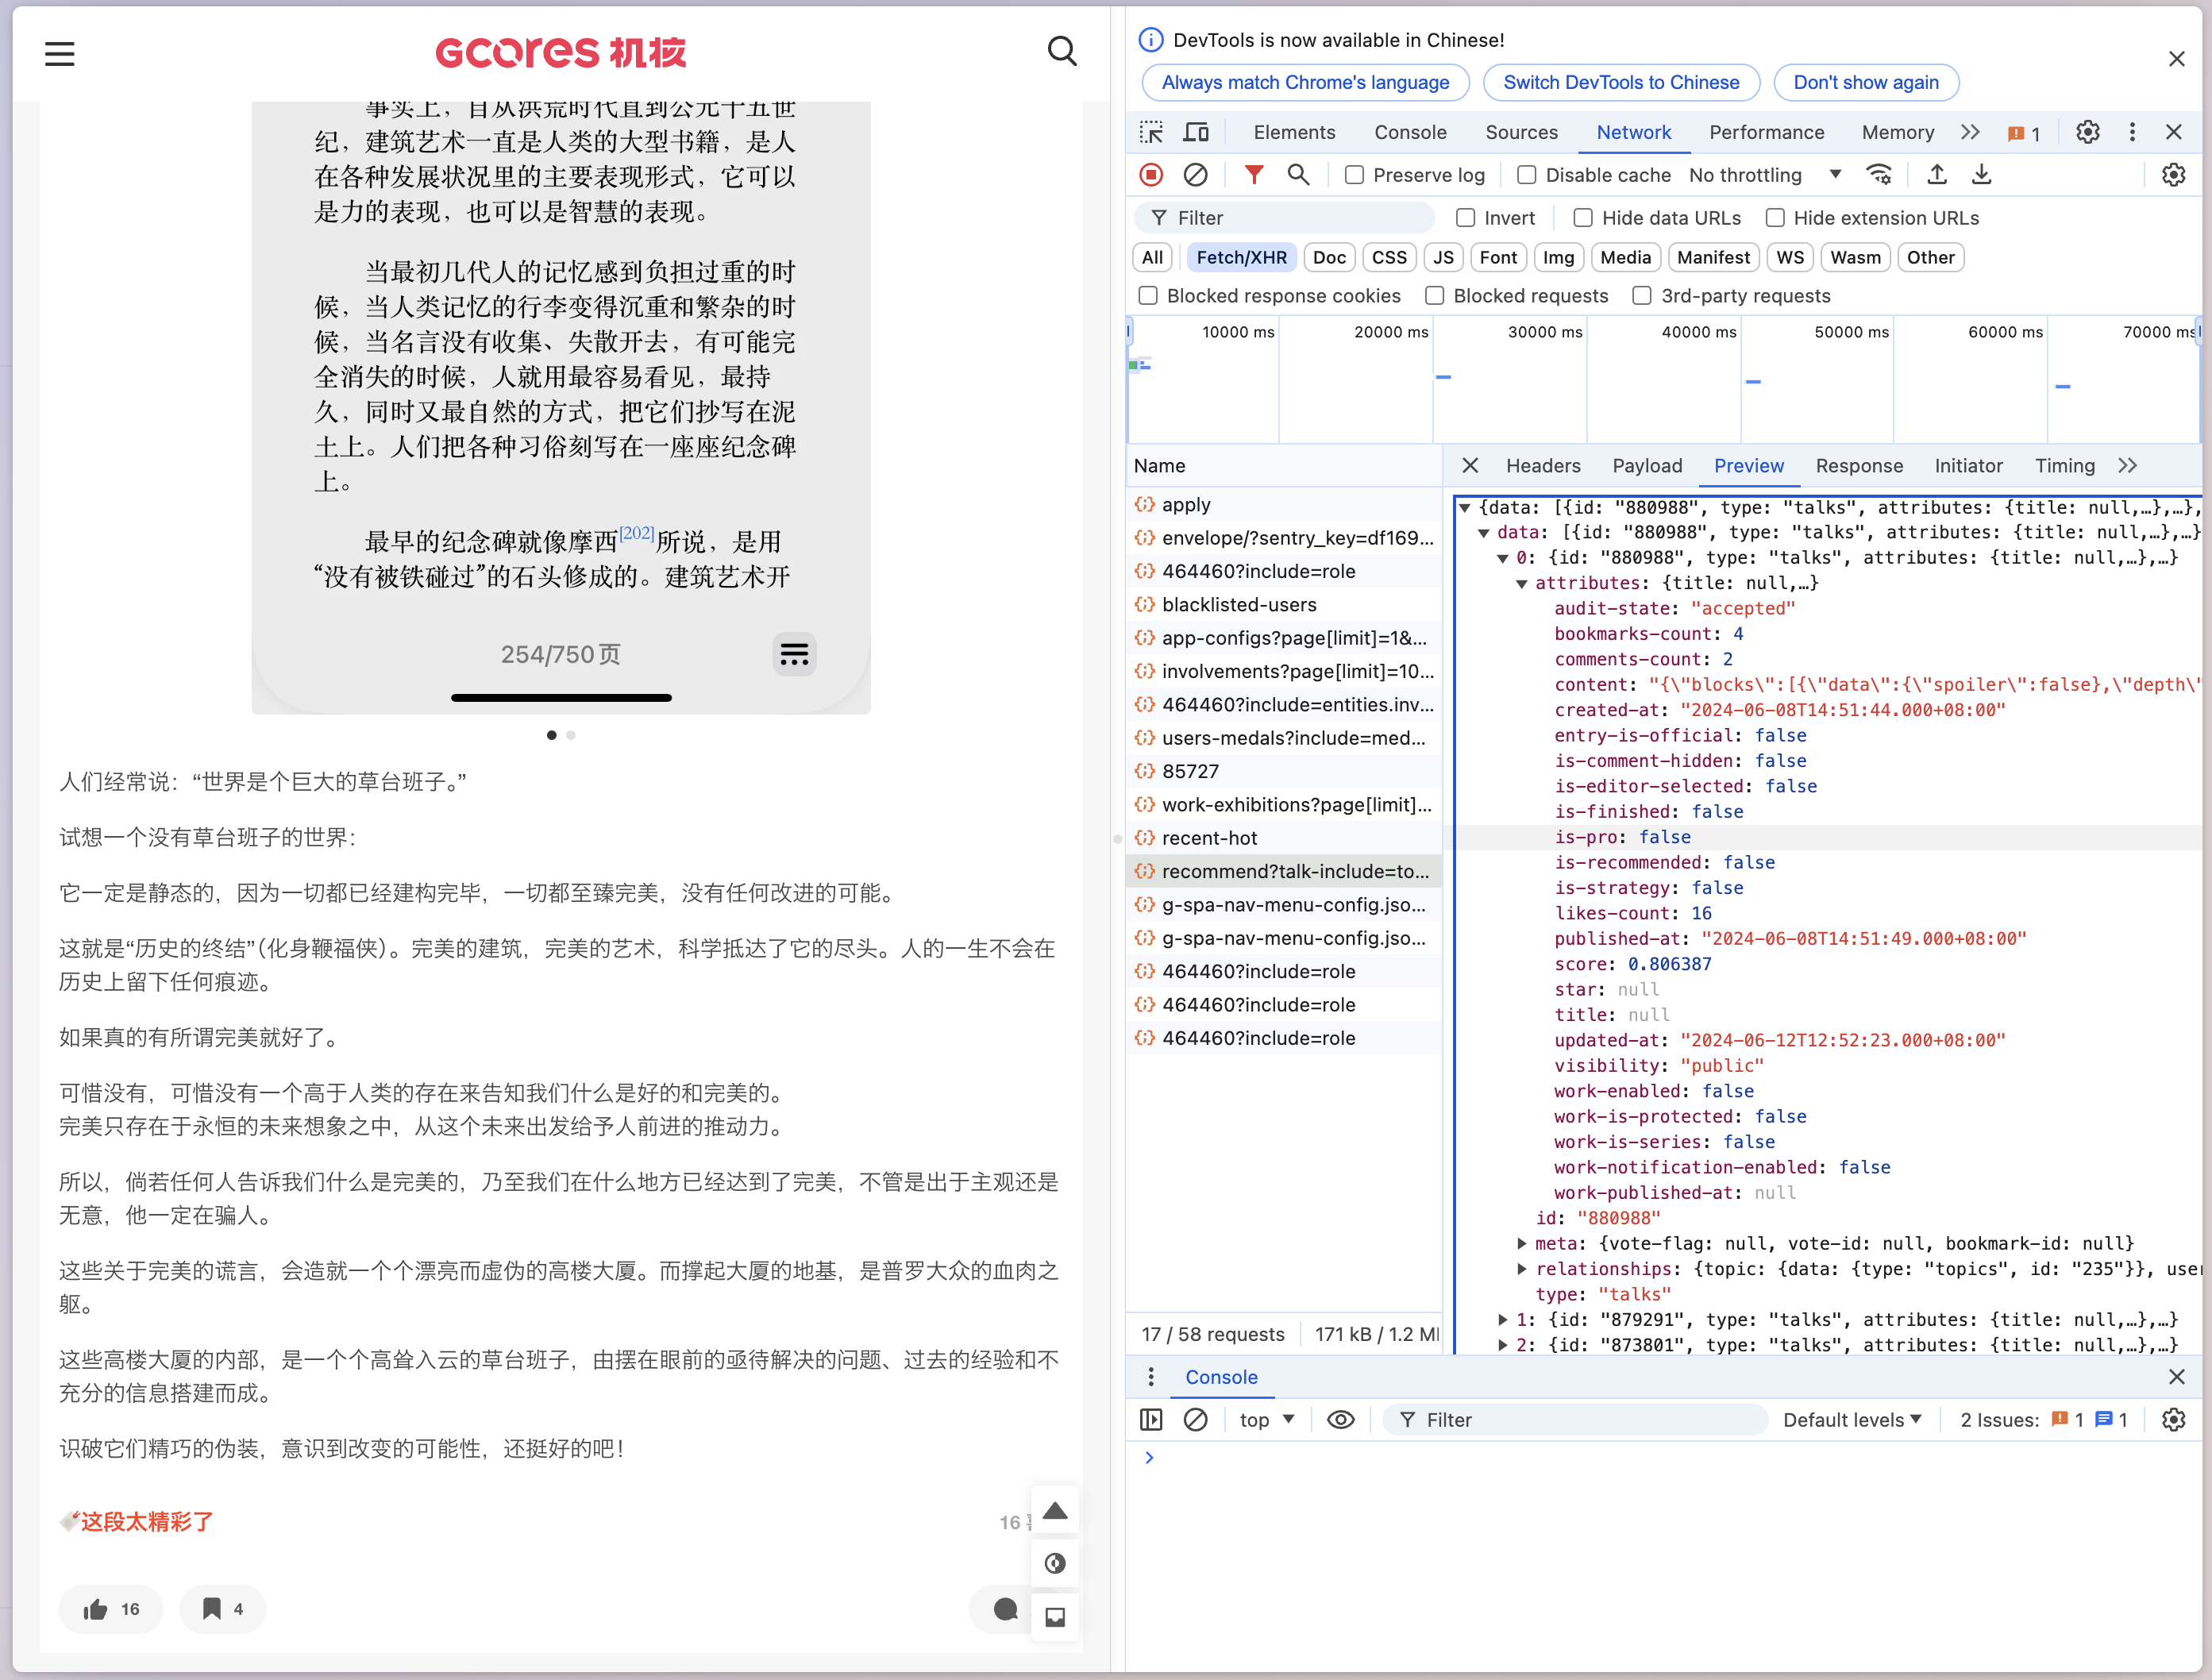
在以前的某次探索中我就发现,机核对爬虫友好得要命,它的数据接口十分统一且富有表达力,比如探索一下我的机组:

发现这条就是用于请求机组数据的 API
https://www.gcores.com/gapi/v1/users/464460/recommend?talk-include=topic%2Cuser%2Chelpful%2Cpoll-options%2Crelated-content.radio%2Crelated-content.video%2Crelated-content.article%2Crelated-content.game%2Crelated-content.film%2Crelated-content.album%2Crelated-content.album-bundle%2Crelated-content.product%2Crelated-content.discussion&original-include=user%2Cdjs%2Ccategory&order-by=time&before=1718720726.986&fields[articles]=title%2Cdesc%2Cexcerpt%2Cis-published%2Cthumb%2Capp-cover%2Ccover%2Ccomments-count%2Clikes-count%2Cbookmarks-count%2Cis-verified%2Cpublished-at%2Coption-is-official%2Coption-is-focus-showcase%2Cduration%2Cdraft%2Caudit-draft%2Cuser%2Ccomments%2Ccategory%2Ctags%2Centries%2Centities%2Csimilarities%2Clatest-collection%2Ccollections%2Coperational-events%2Cportfolios%2Ccatalog-tags&fields[videos]=title%2Cdesc%2Cexcerpt%2Cis-published%2Cthumb%2Capp-cover%2Ccover%2Ccomments-count%2Clikes-count%2Cbookmarks-count%2Cis-verified%2Cpublished-at%2Coption-is-official%2Coption-is-focus-showcase%2Cduration%2Cdraft%2Caudit-draft%2Cuser%2Ccomments%2Ccategory%2Ctags%2Centries%2Centities%2Csimilarities%2Clatest-collection%2Ccollections%2Coperational-events%2Cportfolios%2Ccatalog-tags%2Cmedia%2Cdjs%2Calbums%2Cpublished-albums&fields[radios]=title%2Cdesc%2Cexcerpt%2Cis-published%2Cthumb%2Capp-cover%2Ccover%2Ccomments-count%2Clikes-count%2Cbookmarks-count%2Cis-verified%2Cpublished-at%2Coption-is-official%2Coption-is-focus-showcase%2Cduration%2Cdraft%2Caudit-draft%2Cuser%2Ccomments%2Ccategory%2Ctags%2Centries%2Centities%2Csimilarities%2Clatest-collection%2Ccollections%2Coperational-events%2Cportfolios%2Ccatalog-tags%2Cmedia%2Cdjs%2Clatest-album%2Calbums%2Cis-free%2Cis-require-privilege
原始数据
提炼一下信息:
const user = 464460;

const url = new URL(
  `https://www.gcores.com/gapi/v1/users/${user}/recommend?talk-include=topic%2Cuser%2Chelpful%2Cpoll-options%2Crelated-content.radio%2Crelated-content.video%2Crelated-content.article%2Crelated-content.game%2Crelated-content.film%2Crelated-content.album%2Crelated-content.album-bundle%2Crelated-content.product%2Crelated-content.discussion&original-include=user%2Cdjs%2Ccategory&order-by=time&fields[articles]=title%2Cdesc%2Cexcerpt%2Cis-published%2Cthumb%2Capp-cover%2Ccover%2Ccomments-count%2Clikes-count%2Cbookmarks-count%2Cis-verified%2Cpublished-at%2Coption-is-official%2Coption-is-focus-showcase%2Cduration%2Cdraft%2Caudit-draft%2Cuser%2Ccomments%2Ccategory%2Ctags%2Centries%2Centities%2Csimilarities%2Clatest-collection%2Ccollections%2Coperational-events%2Cportfolios%2Ccatalog-tags&fields[videos]=title%2Cdesc%2Cexcerpt%2Cis-published%2Cthumb%2Capp-cover%2Ccover%2Ccomments-count%2Clikes-count%2Cbookmarks-count%2Cis-verified%2Cpublished-at%2Coption-is-official%2Coption-is-focus-showcase%2Cduration%2Cdraft%2Caudit-draft%2Cuser%2Ccomments%2Ccategory%2Ctags%2Centries%2Centities%2Csimilarities%2Clatest-collection%2Ccollections%2Coperational-events%2Cportfolios%2Ccatalog-tags%2Cmedia%2Cdjs%2Calbums%2Cpublished-albums&fields[radios]=title%2Cdesc%2Cexcerpt%2Cis-published%2Cthumb%2Capp-cover%2Ccover%2Ccomments-count%2Clikes-count%2Cbookmarks-count%2Cis-verified%2Cpublished-at%2Coption-is-official%2Coption-is-focus-showcase%2Cduration%2Cdraft%2Caudit-draft%2Cuser%2Ccomments%2Ccategory%2Ctags%2Centries%2Centities%2Csimilarities%2Clatest-collection%2Ccollections%2Coperational-events%2Cportfolios%2Ccatalog-tags%2Cmedia%2Cdjs%2Clatest-album%2Calbums%2Cis-free%2Cis-require-privilege`
);
进一步观察还能发现似乎分页是利用这个叫 before 的参数确定的,只要不断向前迭代这个参数的时间戳,直到拿不到任何数据为止,于是我们可以得到这样一段代码:
import {
  EMPTY,
  Observable,
  expand,
  map,
  mergeAll,
  mergeMap,
  of,
  shareReplay,
  skip,
  takeWhile,
  tap,
  toArray,
} from "https://esm.sh/rxjs@7.8.1";

const user = 464460;

const url = new URL(
  `https://www.gcores.com/gapi/v1/users/${user}/recommend?talk-include=topic%2Cuser%2Chelpful%2Cpoll-options%2Crelated-content.radio%2Crelated-content.video%2Crelated-content.article%2Crelated-content.game%2Crelated-content.film%2Crelated-content.album%2Crelated-content.album-bundle%2Crelated-content.product%2Crelated-content.discussion&original-include=user%2Cdjs%2Ccategory&order-by=time&fields[articles]=title%2Cdesc%2Cexcerpt%2Cis-published%2Cthumb%2Capp-cover%2Ccover%2Ccomments-count%2Clikes-count%2Cbookmarks-count%2Cis-verified%2Cpublished-at%2Coption-is-official%2Coption-is-focus-showcase%2Cduration%2Cdraft%2Caudit-draft%2Cuser%2Ccomments%2Ccategory%2Ctags%2Centries%2Centities%2Csimilarities%2Clatest-collection%2Ccollections%2Coperational-events%2Cportfolios%2Ccatalog-tags&fields[videos]=title%2Cdesc%2Cexcerpt%2Cis-published%2Cthumb%2Capp-cover%2Ccover%2Ccomments-count%2Clikes-count%2Cbookmarks-count%2Cis-verified%2Cpublished-at%2Coption-is-official%2Coption-is-focus-showcase%2Cduration%2Cdraft%2Caudit-draft%2Cuser%2Ccomments%2Ccategory%2Ctags%2Centries%2Centities%2Csimilarities%2Clatest-collection%2Ccollections%2Coperational-events%2Cportfolios%2Ccatalog-tags%2Cmedia%2Cdjs%2Calbums%2Cpublished-albums&fields[radios]=title%2Cdesc%2Cexcerpt%2Cis-published%2Cthumb%2Capp-cover%2Ccover%2Ccomments-count%2Clikes-count%2Cbookmarks-count%2Cis-verified%2Cpublished-at%2Coption-is-official%2Coption-is-focus-showcase%2Cduration%2Cdraft%2Caudit-draft%2Cuser%2Ccomments%2Ccategory%2Ctags%2Centries%2Centities%2Csimilarities%2Clatest-collection%2Ccollections%2Coperational-events%2Cportfolios%2Ccatalog-tags%2Cmedia%2Cdjs%2Clatest-album%2Calbums%2Cis-free%2Cis-require-privilege`
);

const imageUrl = (image: string) =>
  `https://image.gcores.com/${image}?x-oss-process=image/quality,q_90/format,webp`;

// pagination
url.searchParams.set("before", `${Date.now() / 1000}`);

interface IGcoresTalk {
  text: string;
  images: string[];
  published_at: number;
  tags: string[];
}

const rawGcoresTalkData$: Observable<any[]> = of({
  before: Date.now() / 1000,
}).pipe(
  // raw data
  expand(async ({ before }) => {
    url.searchParams.set("before", `${before}`);
    const res = await fetch(url);
    const data = await res.json();
    if (!data.data || data.data.length === 0) {
      return EMPTY;
    }
    return {
      before:
        new Date(
          data.data[data.data.length - 1].attributes["published-at"]
        ).getTime() / 1000,
      ...data,
    };
  }),
  skip(1),
  // debug
  // take(1),
  takeWhile((v) => !!v.data),
  // filter((v) => v.data.length > 0),
  tap((v) => {
    console.info(v);
  }),
  toArray(),
  shareReplay(1)
);
这样我们就得到了一个承载着一个 user 的所有机组原始数据的 rx 流了。
处理数据
有了原始数据,接下来要处理成 Markdown,直接开始处理,要点在于:
决定好需要展示的内容
理解机核的接口字段
机组和朋友圈微博什么的都差不多,就是文字配图,再加上一些 tag。就这样平铺着展示吧。
机组的数据可以被定义如下:
{
  "blocks": [
    {
      "data": { "spoiler": false },
      "depth": 0,
      "entityRanges": [{ "key": 0, "length": 1, "offset": 0 }],
      "inlineStyleRanges": [],
      "key": "7u4tf",
      "text": "-",
      "type": "atomic"
    },
    {
      "data": { "spoiler": false },
      "depth": 0,
      "entityRanges": [],
      "inlineStyleRanges": [],
      "key": "wisz4",
      "text": "核聚变好玩,和雨川西蒙合了影,见到了做志愿者的 merz,然而社恐差点没敢上前搭话,腿快走断了,给没能来的小朋友们买了点纪念品,Celeste 随机异变速通震撼我妈,全程硬是没把因为震惊而张开的大嘴合上。可惜周天广州下雨航班被取消所以急匆匆买了深圳回上海的高铁票就没去成周天的。",
      "type": "unstyled"
    },
    {
      "data": { "spoiler": false },
      "depth": 0,
      "entityRanges": [],
      "inlineStyleRanges": [],
      "key": "nzffe",
      "text": "",
      "type": "unstyled"
    },
    {
      "data": { "spoiler": false },
      "depth": 0,
      "entityRanges": [],
      "inlineStyleRanges": [],
      "key": "7f8m6",
      "text": "下次还来!",
      "type": "unstyled"
    }
  ],
  "entityMap": {
    "0": {
      "data": {
        "caption": "",
        "images": [
          {
            "path": "0ad6514d154c80a9ef6b4b0d6173d132-3024-4032.HEIC",
            "width": 3024,
            "height": 4032
          },
          {
            "path": "69cea053377d3155d5f7e22e8584f289-4032-3024.HEIC",
            "width": 4032,
            "height": 3024
          },
          {
            "path": "aedf102fa319ce3df2438386f894def4-4032-3024.HEIC",
            "width": 4032,
            "height": 3024
          }
        ]
      },
      "mutability": "IMMUTABLE",
      "type": "GALLERY"
    }
  }
}
结合我们要输出的内容,定义如下结构体:
interface IGcoresTalk {
  text: string;
  images: string[];
  published_at: number;
  tags: string[];
}
我们要输出的就是 string 类型的 markdown 文本就好。
const cookedData$ = rawGcoresTalkData$.pipe(
  mergeAll(),
  mergeMap(({ data, included }): IGcoresTalk[] => {
    // we only need the title as the tags of the talk
    const mapTypeIdToTitle = Object.fromEntries(
      included.map((v: any) => [`${v.type}-${v.id}`, v.attributes.title])
    );
    console.info(mapTypeIdToTitle);
    const talks = data
      .filter((v: any) => v.type === "talks")
      .map((v: any) => {
        const content = JSON.parse(v.attributes.content);
        const text = content.blocks
          .filter((v: any) => v.type === "unstyled")
          .map((v: any) => v.text.replace(/\#/, "\\#"))
          .join("\n");

        const images = (content.entityMap?.[0]?.data?.images ?? []).map(
          (v: any) => v.path
        );
        const published_at = new Date(v.attributes["published-at"]).getTime();
        const tags = Object.values(v.relationships as any[])
          .filter((v) => !!v.data)
          .filter((v) => ["topics", "games"].includes(v.data.type))
          .map(({ data }) => mapTypeIdToTitle[`${data.type}-${data.id}`]);
        return {
          text,
          images,
          published_at,
          tags,
        };
      });

    return talks;
  })
);
现在我们就获得了一堆我们想要的数据结构,接下来只要处理成 string 就好。
cookedData$
.pipe(
//
tap((v) => {
console.info(v);
}),
map((v: IGcoresTalk): string => {
const published_time = new Date(v.published_at);
const title = `## ${published_time.getFullYear()}-${
published_time.getMonth() + 1
}-${published_time.getDate()}`;
const content = v.text;
const images = v.images.map((v) => `})`).join("\n");
const tags = v.tags.map((v) => `- ${v}`).join("\n");
return `${title}\n\n${images}\n\n${content}\n\n${tags}\n`;
}),
toArray(),
map(
(all) =>
`---\ntitle: '0xc1 的机组日志'\ndate: ${new Date().toISOString()}\n---\n原始链接:[Thrimbda 的机组](https://www.gcores.com/users/464460/talks)\n${all.join(
"\n\n---\n---\n\n"
)}`
),
tap((v) => {
console.info(v);
}),
tap((v) => Deno.writeTextFile(`./content/gcores-talks.md`, v))
)
.subscribe();
我选择了最粗暴的处理方式,直接输出到附近的目录。
这段代码的完整版在这里,通过 deno 来运行:
deno cache get-gcores-talk.ts
deno run -A get-gcores-talk.ts
图片的展示与渲染
至此,我们已经输出了一个合法的 Markdown, 足够渲染成一个还算能看的网页了。

但是图片看起来很奇怪:以 Markdown 直接渲染的方式平铺堆叠会显得图片和文字的比例十分不协调,给人一种头重脚轻的感觉,要是能像机核那样做成一个滑动图片组就好了。
方案选型
Markdown 支持通过 HTML 来扩展它的表达力,所以无论如何我们都可以通过自己的代码将图片直接渲染为 HTML 来获得想要的效果。但 Zola 提供了另一种方式,能够使我们更轻松的实现目标:Shortcodes | Zola
我们要做的就是编写一段 HTML 模板辅以合适的 CSS 提供样式、JS 代码负责交互;然后在正文 Markdown 中直接调用这个 HTML。
等等?编写 HTML + CSS + JS 是吧,梦回大一。
编写前端
HTML
HTML 的部分十分简单且无聊,为每个图片组提供如下的元素即可:
滑动图片组本身的容器
图片
下方标识索引的原点
用来左右切换图片的箭头按钮
<div class="slider-container">
<div class="slider-wrapper">
<div class="slider">
{% for slide in slides %}
<div class="slider-item">
<img src="{{slide}}" />
{% if slide.caption %}
<div class="caption">{{slide.caption}}</div>
{% endif %}
</div>
{% endfor %}
</div>
<button class="slider-prev" type="button">❮</button>
<button class="slider-next" type="button">❯</button>
</div>
<!-- The dots/circles -->
<div class="slider-dot-container">
{% for slide in slides %}
<span class="slider-dot"></span>
{% endfor %}
</div>
</div>
CSS
得益于更现代化的前端技术,如今使用 flex 布局来实现这一点十分简单,核心思路就是将图片们一字排开,但是只露出一个图片的位置,其他的图片全部被隐藏在后面:
.slider-wrapper {
  overflow: hidden;
  position: relative;
  box-sizing: border-box;
  width: 100%;
}

.slider {
  position: relative;
  display: flex;
  box-sizing: border-box;
}

.slider-item {
  position: relative;
  flex: 1 0 100%;
  min-height: 150px;
  max-height: min(550px, 55svh);

  display: flex;
  align-items: center;
  justify-items: center;
  box-sizing: border-box;

  overflow: visible;
}

.slider-item img {
  position: relative;
  width: auto;
  max-height: 100%;
  margin: auto; /* 在水平方向上居中 */
}

/* Next & previous buttons */
.slider-prev,
.slider-next {
  /* cursor: pointer; */
  position: absolute;
  /* top: 50%; */
  width: auto;
  height: 100%;
  transform: translateY(-100%);
  font-weight: bold;
  font-size: 1.2rem;

  z-index: 1;
  color: white;
  transition: 0.6s ease;
  border-radius: 5px;
  border: none;
  background-color: transparent;
}

/* Position the "next button" to the right */
.slider-next {
  right: 0;
  border-radius: 5px;
  /* border-radius: 3px 0 0 3px; */
}
.slider-prev:hover:enabled,
.slider-next:hover:enabled {
  border: none;
  color: var(--accent);
  background-color: rgba(71, 71, 71, 0.3);
}

.slider-dot-container {
  text-align: center;
}

.slider-dot {
  cursor: pointer;
  height: 15px;
  width: 15px;
  margin: 0 2px;
  background-color: #bbb;
  border-radius: 50%;
  display: inline-block;
  transition: background-color 0.6s ease;
}
.slider-dot:hover,
.slider-dot-active {
  background-color: #717171;
}
JavaScript
JS 的部分负责让用户能够通过交互来切换可见区域的图片具体显示哪一张,这些交互包括:
鼠标点击左右按钮
鼠标点击小圆点
在触控设备上的左右滑动
在 web API 收编了 JQuery 之后,加上 rxjs 的帮助,这一点十分简单:
const ELS = (selector, parent) =>
  (parent || document).querySelectorAll(selector);
const EL = (selector, parent) => (parent || document).querySelector(selector);
const mod = (n, m) => ((n % m) + m) % m;

ELS(".slider-container").forEach((EL_parent) => {
  const EL_slider = EL(".slider", EL_parent);
  const ELS_items = ELS(".slider-item", EL_parent);
  const ELS_dots = ELS(".slider-dot", EL_parent);
  const total = ELS_items.length;
  let c = 0;

  const setDotActive = () => {
    ELS_dots.forEach((EL_dot, i) => {
      EL_dot.classList.toggle("slider-dot-active", i === c);
    });
  };

  setDotActive();

  const anim = () => {
    EL_slider.style.transform = `translateX(-${c * EL_slider.offsetWidth}px)`;
  };
  const prev = () => {
    distance = 0;
    startX = 0;
    c = mod(c - 1, total);
    setDotActive();
    anim();
  };
  const next = () => {
    distance = 0;
    startX = 0;
    c = mod(c + 1, total);
    setDotActive();
    anim();
  };

  EL(".slider-prev", EL_parent).addEventListener("click", prev);
  EL(".slider-next", EL_parent).addEventListener("click", next);

  ELS(".slider-dot", EL_parent).forEach((dot, i) => {
    dot.addEventListener("click", () => {
      c = i;
      setDotActive();
      anim();
    });
  });

  const touchstart$ = fromEvent(EL_parent, "touchstart");
  const touchend$ = fromEvent(EL_slider, "touchend");
  const touchmove$ = fromEvent(EL_slider, "touchmove");

  touchstart$
    .pipe(
      tap(() => {
        EL_slider.style.transition = "none";
      }),
      switchMap((start) =>
        animationFrames().pipe(
          withLatestFrom(touchmove$),
          map(([, touchEvent]) => {
            const distance =
              touchEvent.touches[0].clientX - start.touches[0].clientX;

            EL_slider.style.transform = `translateX(-${
              c * EL_slider.offsetWidth - distance
            }px)`;
            return distance;
          }),
          takeUntil(touchend$),
          defaultIfEmpty(0),
          last()
        )
      ),
      tap({
        next: (distance) => {
          EL_slider.style.transition = "transform 0.3s ease-in-out";
          if (distance / EL_slider.offsetWidth > 0.2) {
            c = mod(c - 1, total);
          } else if (distance / EL_slider.offsetWidth < -0.2) {
            c = mod(c + 1, total);
          }
          setDotActive();
          anim();
        },
      }),
      repeat()
    )
    .subscribe();
});
整段代码的大意就是针对每一段滑动图片组记录一个当前展示的图片 index: [0, 1, ..., imageNumbers - 1],用户的交互会改变 index,从而计算出当前滑动图片组应该偏移多少个像素来展示 index 所指示的图片。
我比较得意的作品是最后这段用于触控交互的 rx 代码。
触控交互相比于按钮交互更复杂,因为在用户滑动的过程中,图片要跟着用户的手指一起滑动,而且必须将这个手感调教得比较好才不会使得用户沮丧。
这份复杂意味着交互需要更多的信息,以及更复杂的 WEB API。
从交互逻辑上讲,我们需要记录触控开始时候手指的像素位置,还有每一个渲染帧到来时手指像素位置相对于初始位置的偏移量,然后在每一帧渲染的时候将这个偏移量附加给滑动图片组,使得图片跟随手指一起滑动。在移动过一段距离之后手指离开屏幕时我们要决定是否切换图片,比如手指只是轻点了一下屏幕,造成了 2 个像素的向右偏移,这时候图片不应该被切换;而当手指向右划过一半屏幕的时候,应该切换图片。不妨设置一个偏移量相对于整个容器的阈值为 20%,如果手指滑动的距离超过了 20% 的图片组宽度,我们认为应该切换图片。
从 API 方面讲,相关的事件有 3 个:
touchstart - 标识着用户开始接触屏幕,这个事件携带最初手指的像素坐标。
touchmove - 每当用户手指移动时,都会触发这个事件,携带当前手指坐标。
touchend - 标识着手指离开屏幕。
rx 十分适合实现这类需求,我们将用户的手指触控事件包装成一个数据流。经过处理后变成手指的横向偏移量流,用来在每一个动画帧中更新图片的位置。最后在触控结束之后,根据偏移量和容器宽度的比值决定是否切换图片。
快乐源自何处
工作会给人带来快乐,因为我们的脑子喜欢反馈与循环。
痛苦来自于不完整或者过于漫长的循环。而编写前端代码是如此的快乐,这种快乐是因为它的循环足够高效,每次修改代码,伴随着保存与刷新,就可以直接看到修改的效果。以至于在几分钟内可以完成数次这样的反馈循环,从而带来快乐。
希望这种快乐可以常伴大家。
总结
时至今日,这篇文章所讲述的内容作为一个大学生的博客的话还算是锐意进取,但它的深度相对于我的工作年限来说实在是有些浅薄,以至于我在写它的时候时常感到不好意思。
但无论如何,相比于上次搭建博客的囫囵照抄,这次我对自己的博客的每一处都有了完全的掌控力。捯饬的过程带给了我一种十分纯粹而简单的快乐,正是这份快乐让我厚着脸皮把它写完。